
Something I’ve been wanting to make for a few months is a Deadpool ami. It’s the birthday of one of my favorite co-workers today, and she loves Deadpool. So I set out last week determined to make an ami version for her.
Once again, as with Elmo, I couldn’t find a free pattern that I liked, so, I made my own.
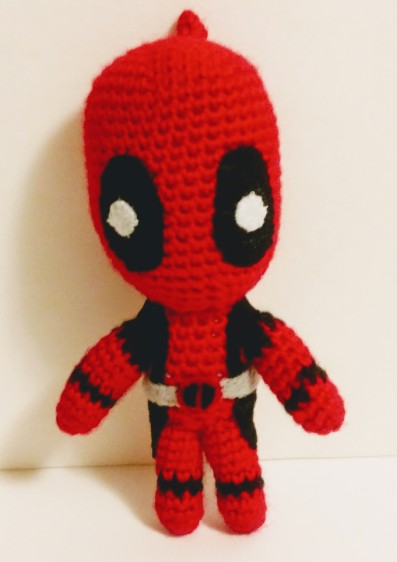
I took inspiration from pictures of others’ work that I came across online. Merging many of the ideas I saw, This is what I came up with.

My co-worker loves him and has him proudly displayed on her desk.
If you know any Deadpool fans, this might be the perfect gift. He’s about 6 inches tall and surprisingly easy to make.
Here’s the PDF version of the pattern. Just click the link then save or print it. Or you can just view it in the browser (below).
Stitches used (American terminology used)
If you are unfamiliar with any of these stitches, I recommend searching for and watching one of the numerous instructional YouTube videos available.
MR = magic ring
sc = single crochet
inc = increase
dec = decrease
Sl = slip stitch
Materials needed
Worsted weight yarn in red, and black
Black, white, grey and red felt
F crochet hook
Black, red and grey embroidery floss and embroidery needle (alternatively, you can use sewing thread in the same colors and a small sewing needle)
Yarn needle
Craft glue (optional)
Scissors
Head
R1: (in red) MR 6 (6)
R2: [inc] x 6 (12)
R3: [sc,inc] x 6 (18)
R4: [sc 2, inc] x 6 (24)
R5: [sc 3, inc] x 6 (30)
R6: [sc 4, inc] x 6 (36)
R7-20: sc 36 (36)
R21: [sc 4 , dec] x 6 (30)
R22: [sc 3, dec] x 6 (24)
R23: [sc 2, dec] x 6 (18)
Start stuffing head
R24: [sc, dec] x 6 (12)
Stuff firmly
R25: [dec] x 6 (6)
Sl to finish off leaving a long tail to sew head to body.
Point on head
R1: MR 3 (3)
R2: sc, inc, sc (4)
R3: sc 4 (4)
Sl to finish off leaving a long tail to sew to head. Do not stuff. Position at top rear of head and attach.
Eyes (make 2)
(in black felt) Cut out 2 large ovals
(in white felt) Cut out 2 small circles
Stitch the circles of white circles to the center of each black oval using white embroidery floss. Keeping the tail of red yarn at the bottom of the head , position and affix black ovals at front of face. Make sure they are positioned relative to the point on the top rear of the head. When looking at the face straight on, the point should be in the middle relative to the eyes. You can first glue the eyes in place, then when the glue is dry, stitch them around the edge with black embroidery floss to secure them. Alternatively, you can stitch them straight on without using the glue. I find the glue helpful so that they stay where I want them to while stitching.
Body
R1: (in red) MR 6 (6)
R2: [inc] x 6 (12)
R3: [sc, inc] x 6 (18)
R4-12: sc 30 (30)
R13: [sc, dec] x 6 (12)
Stuff
R14: [dec] x 6 (6)
Sl to finish off. Weave in end.
Sew head to body
Arms (make 2)
R1: (in red) MR 5 (5)
R2: [sc, inc] x 5 (10)
R3-4: sc 10 (10)
R5: (in black) sc 10 (10)
R6-9: (in red) sc 10 (10)
R10: (in black) sc 10 (10)
Stuff
R11: [sc, dec] x 5 (5)
Sl to finish off, leave a tail to stitch closed and attach to body
Legs (make 2)
R1: (in red) MR 5 (5)
R2: [sc, inc] x 5 (10)
R3-4: sc 10 (10)
R5: (in black) sc 10 (10)
R6-10: (in red) sc 10 (10)
Stuff
R11: [sc, dec] x 5 (5)
Sl to finish off, leave a tail to stitch closed and attach to body
Embellishments
Side panels
From black felt, cut out 2 upside down teardrop shapes and cut a hole large enough for each arm to slip through. Insert arms through the holes with the pointy end facing down. Using black embroidery floss, stitch into place. You may need to trim the felt at the top and bottom to fit your Deadpool. The top should extend right up to where the head meets the body. The point at the bottom should extend down the side of the leg. However, it should not touch the black stripe around the calf.
Belt
Using grey felt, cut a strip long enough to wrap all the way around the waist.

Wrap it around with the join at the front. Stitch into place using grey embroidery floss. 
Using red felt, cut out a small circle and using black felt, two semi-circles that together are smaller than the red circle.
 Position and stitch the black semicircles on the red circle using black embroidery floss.. Then position the belt buckle so that it covers the join at the front of the belt and stitch into place using red embroidery floss.
©MesAmis Crocheted Fun
This pattern is free for you to use. I have no problem with you selling your finished products created using this pattern. I only ask that you credit your source. Please provide a link to my original blog post so that others can find and use the pattern for free too.
I’d love to see your work. Please share pictures. If you send them to me, let me know if you’re OK with me posting them on my blog. Be sure to include a link to your own website or online store. I will add it to the post so that subscribers can check out your other creations too.
